It took me 2 Chinese Diesel Heater kits and 2 install attempts to get a working heater. Don’t make the mistakes I did! I have experience and confidence cutting holes into my minivan and making significant modifications but this project kicked my ass!!
When I decided to do vanlife through the winter this year I realized that I would need a more sustainable heat source than my propane heater. I know there’s people in the vanlife community that will make a propane heater work but for me the heat it produced was uncomfortable, gave me a bit of a head ache, and emitted large amounts of moisture into my van.

Here is my Mr. Buddy Grey 4000 – 9000 BTU heater keeping me warm during a 2 day snow storm in Pagosa Springs CO. I would use the 1lb green propane bottles just because they are more convenient but they certainly are not cheap. Sometimes I would connect it directly to my 1 gallon refillable propane bottle, fuel filter, and 4’ adapter hose and this was far more cost effective than the green 1lb bottles. The major down side to this propane heater is it puts out too much heat even on low and I need to constantly be turning it on and off to keep the small space in my minivan van from getting either too hot or too chilly.
I decided to go with a 2kw Diesel Heater since my minivan interior space is very small and felt a 5kw heater would be far more than needed
After watching some video’s and doing some initial research I found out that a true 2kw heating unit measures 28cm x 11cm x 11cm. I decided to go with a 2kw kit from Aliexpress based from a link from this YouTube video. It looks like this kit is no longer available. This kit had a 5l fuel tank, the new blue lcd controller, and measured 28cm x 11cm x 11cm which was the size I was looking for.

Buying this kit off Aliexpress was my first mistake, This kit came with a crappy fuel line and exhaust muffler. If your kit comes with the green fuel line I would highly recommend replacing it with the thinner and stiffer white fuel line that provides a consistent fuel dose. The green hose is flexy and can deliver too much fuel to the combustion chamber. The exhaust muffler this kit came with was a piece of crap and had air gaps all around the seam and the coupler where the exhaust pipe is connects broke off. I did my best to fix this using JB Weld but with too many bends in my exhaust pipe and a low quality muffler made for a poor performing exhaust.
![IMG_20201005_150344[1]](https://journeyvision.net/wp-content/uploads/2020/11/img_20201005_1503441.jpg "IMG_20201005_150344[1]")
I drilled my initial holes for the exhaust, intake, and fuel line, then prepared the surface to mount the heating unit with aluminum tape. Here lies another one of my mistakes. I should have cut larger holes and later I did because the exhaust gets over 400 degrees Fahrenheit and can melt or damage the mounting surface. In my case the sound deadening material I used started to melt and ooze out of the holes. Yikes! I later cut 2 bigger holes and that took care of the problem. I have seen a lot of people recommend one of these heavy duty turrets from eBay for your install. If I wasn’t rushing my install I probably would have used a turret.

Here is my 2kw unit mounted in the rear cavity of my 2003 Honda Odyssey minivan where the 3rd row seats used to be.

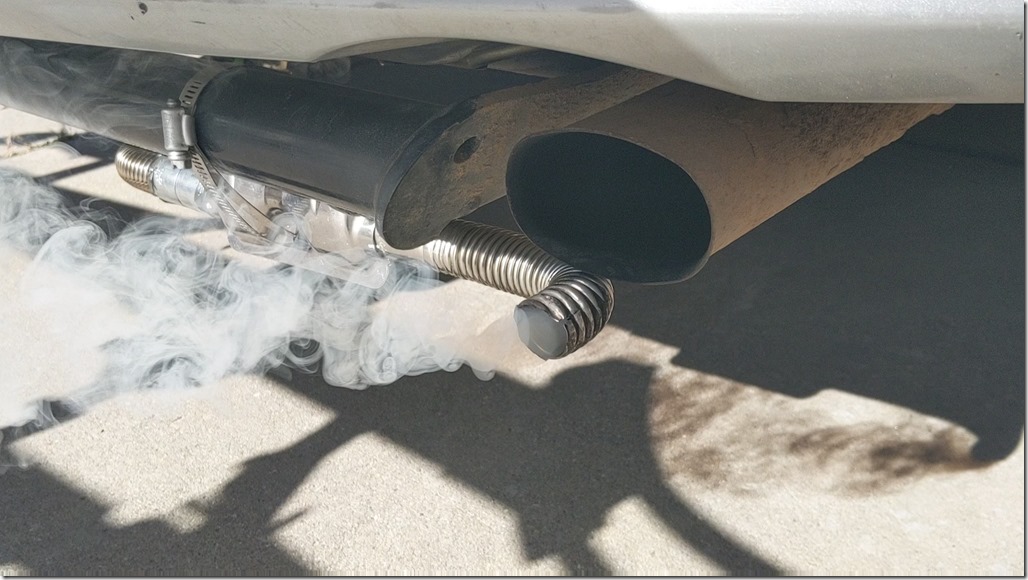
Here is the rats nest of my first install! Yikes! I did not take into consideration that since the combustion chamber does not have a carburetor its very sensitive to oxygen intake and fuel mixture.
My first install had too many sharp bends in the exhaust pipe, a pinched intake hose from a zip tie, and the shitty green fuel line. This adds up to a poor oxygen/fuel mixture and a badly smoking exhaust pipe.
After running the heater for a few hours the unit started to smoke. It smoked so much that it caked up with burnt carbon and would no longer ignite. After some intense trouble-shooting I came to the conclusion that I would need take the unit completely apart and clean out the carbon build-up and redo the intake and exhaust. In addition to this I would need to acquire special tools and parts to include new gaskets, glow plug remover, exhaust pipe, muffler, air cleaner, and fuel line. I was having anxiety about opening up the heater, cleaning it, then put it back together. I think I could handle this task if I had the time but I needed to get back on the road and winter was coming fast.
A good resource during my trouble shooting was the Chinese Diesel vehicle air heaters – Troubleshooting & Parts sales group on Facebook. If you are on Facebook look it up. I learned a lot from this group.
After a couple of restless nights thinking about it I decided not to clean the heater and just order a new 2kw Chinese Diesel Heater kit from eBay. This was a much better kit and came with a higher quality exhaust muffler, an air filter instead of an air silencer, and the proper fuel line. The best part was I didn’t have to take apart the heating unit I ruined and clean it! These heaters are cheep in the long run. I was glad I opted to just buy a new unit. When I have more time I would like to take apart this unit and learn how to clean and maintain it.
My second install went much better.

Simple 90 degree bend in the exhaust pipe and a much better silencer. I drilled a small pinhole at the lowest point of the exhaust. This will prevent water buildup since I was unable to mount the pipe sloping downward.

The air intake was also installed much cleaner with no more zip ties. I also installed an air cleaner instead of the air silencer that the previous kit came with. The difference between the two is the cleaner has a mesh screen to keep debris out and the silencer does not. The silencer only has foam wrapped around the outside to make the intake quieter.

Here is the improved fuel line and larger cutouts to accommodate for the extreme heat given off by the combustion chamber exhaust. This is where the turret would come in handy. I made sure my fuel lines are secured tightly with the included hose clamps. Spray paint is used to cover any exposed metal. Most of the drilling surface in this 3rd row seat compartment was 1/2’ thick composite plastic with a steel frame and very easy to cut through.
![PXL_20201123_180047989[1]](https://journeyvision.net/wp-content/uploads/2020/11/pxl_20201123_1800479891.jpg "PXL_20201123_180047989[1]")
Here is my fuel pump install. Yes you can hear it ticking inside the van! I used a self tapping screw to mount it directly to my tow hitch. Not much room to work with under my minivan but I was able to get about a 20deg tilt in the pump and so far its been working great. The new fuel line delivers and much better dose of fuel to the heater and seems to work much better. Due to the nature of how this pump works its important that they are mounted in a tilted fashion. I have heard anywhere from 45-90 degrees is ideal.

I wanted to go with the 5l fuel tank instead of the more common 10l tanks you see in most kits. It mounted excellent using self tapping screws into the steel insides of my bumper. Its somewhat stealth as it tucks in nicely behind my bike rack. This also made for easy routing of the fuel line and keeps the clingy diesel fuel smell out of my cabin. The 2kw heater is incredibly efficient on its low setting and this 5l fuel tank lasts for hours and hours. If you look closely you can see two dots spaced about 1 1/4 inch apart on the left side of the tank. To get an idea of fuel consumption, that is how much fuel it used on the low setting for 8 continuous hours!! At some point I want to paint it with grey Plasti-Dip to help protect the fuel tank and diesel inside.

60mm vent ran to the far back of my passenger side cabinet. You may notice the thermal tape inside covering half the outlet. This is done to help create back pressure and increase flow to the longer running hot air duct mounted to the front of the cabinet.

This is a photo of my 60mm hot air vent mounted to the front of my passenger side cabinet. I am glad that I installed 2 hot air ducts to better distribute the hot air.


Above are some examples of my duct work and insulation. After it was routed I covered the aluminum hose with 2 layers of insulation. First layer is motorcycle fiberglass exhaust wrap and the silver outer layer is self adhesive water heater insulation cut to fit. Running the aluminum hose and insulating everything was far more time consuming that I expected. Its not pretty but it does work well.
I used 4 sections of 60mm aluminum ducting and a T Joint to get the length I needed. This took 3 additional 60mm aluminum ducting segments I ordered form Amazon then taped them together using aluminum tape.
One thing I didn’t realize during my initial install was how much heat the hot air exhaust pumps out. Also it tends to get really hot around the joints and intersections. I learned the hard way that you need to use the 60 mm aluminum ducting the kits come with. I thought I could get away with a vinyl flex duct hose I found on Amazon since it was difficult to find long sections of 60mm hose to fit this smaller 2kw unit. The vinyl duct hose was described as duct work for your vehicles heater/AC and sounded like something that could work. The first time I fired up the heater the vinyl hose melted and started smoking as soon as it warmed up! Yikes again! The aluminum hose holds up great to the heat but does get really hot and I realized it would need some serious insulation to protect my precious gear and supplies near the ducting.
Most of the ductwork runs through my largest cabinet where I store all my bedding. The double insulation works well enough for me not worry about my expensive down sleeping bags or anything else melting while stored. So far everything is keeping at a safe temperature.

The LCD controller is straight forward to install and I find it easy to operate. There is a setting to prime your fuel line and I quickly found out these heaters do not have a thermostat but instead 2 timers you can program. You adjust the temperature output by increasing or lowering the speed of the fuel pump. It also came with a remote that works well but I don’t really see myself using it much since the main controller is usually within arms reach for me. This YouTube video helped me learn how to navigate the settings.
I still find it amusing watching the indicator go through it startup cycle and watch the animations!
Summary
It took me two attempts to get this heater working right but when it does work its pretty incredible. Clean, dry, efficient heat that seems to last for ever. I could be parked in sub freezing temperatures and stay toasty warm for days. I have found that when the outside ambient temperature is above 40 degrees it can get hot inside while running on low. To solve this I just let out some warm air using my roof vent.
I do worry about the exhaust, intake and fuel lines exposed in the underside of my van but so far everything has held up and stayed out of the way on bumpy backcountry roads.
I wish I didn’t feel rushed during my install and should have taken more time and research to plan. It was hard to find much information on diesel heater minivan installs which I think a minivan install can be more complex than a larger van since I had tight spaces to work with and no clearance under the vehicle.
I do have a remaining issue with this heater. It starts up smoky when I am above 6,000 feet in elevation. For somebody like me who spends a lot of time in Colorado this is going to be an issue. I have a feeling I can tune it to run better at higher elevations but I need to set aside some time to trouble-shoot and figure this process out. There are some advanced setting that can be adjusted to decrease fuel and increase fan speed and I have heard of people using a cleaner burning kerosene mixture to get it running better at elevation. More to come on this and I will be sure to update the blog on what I find.
Hopefully this blog post helps some people with their heater install and maybe avoid some of the mistakes I made along the way. If your have any questions or would do something different please let me know in the comments. I am always learning!
I would highly recommend watching this YouTube video series by John McK 47. The series is long and very detailed but If I would have discovered these videos by my first install and watched them all things would have gone much better.
Here is a nice looking 2kw unit currently on Amazon. It looks like it has nice parts and I like the aluminum body. If I was to by another heating unit it would probably be this.
If you are considering a 5kw heater this is a decent kit and the Happybuy kit is popular.
Here is the kit I bought of eBay.
Although this heater unit came with nice parts I cannot 100% recommend it. The plastic outer housing it came with was warped and would have leaked hot air. I ended up switching out the housing from my first heater and that solved the problem.

Super informative! Thanks so much.
LikeLike
Did you ever solve the problem of using the heater above 6000′ ? I’ll be spending a lot of time out west at elevation and don’t want to install something I can’t use.
LikeLike